

You just bought a Tundra…what next?
Hopefully you read our guide of what to check when Purchasing a 2000-2006 Tundra and there weren’t any nasty surprises once you signed the paperwork. As long as all of the maintenance items are up to date, now begins the fun part: MODS.
Sure, the trucks as they came from the factory are great, but wouldn’t like you something even better? Here is the list of the top mods we recommend you complete once you buy your truck.
#1 - Rear Differential Breather Relocation

If you plan on using your truck for off-roading, one of the first things you should take care of is a rear differential breather relocation. The breather valve aids in venting hot air as the differential heats up, and if plugged, can cause axle seals to leak among other issues. Stock, the breather is located directly on the axle and if you go through a deep enough water or mud crossing can actually allow whatever you’re driving through into your differential, quickly destroying it.
While you can source the parts yourself, purchasing this kit from The Yota Shop actually works out cheaper and allows you to move the breather to a safer location; the gas cap or rear taillight are the most popular places to store them. Go ahead and spring for the 8’ kit to give you a bit extra breathing room during the install. The front diffs are already at the same height as your intake, so unless you go for a snorkel you won’t need to adjust their position further up.
#2 - Lift / Level Kits
The #1 mod that most people will want to do is to add a lift or leveling kit to their truck; stock height is boring, so I can’t blame them.
In general, to level the truck you will need to raise the front suspension 1-1.5” to eliminate the factory rake. Any higher lift than that, and you will need to raise the rear as well.
Several considerations when lifting your truck:
1 - If raising 3” or more, you will need to upgrade to aftermarket Upper Control Arms, as the factory arms will put too much stress on the upper ball joints at that angle.

Example of a 2.5” front lift with 1.5” add a leaf in rear
2- Raising 3” or more, it is highly recommended that you also upgrade your CV Axles to high angle boots to reduce the risk of them tearing and losing all grease. Some companies recommend installing a differential drop kit to fix this issue, but in practice there has not be significant improvement in reducing CV Axle wear and tear.
3- Another factor to consider is the factory brake lines in the front and rear can cause issues with lifts of 2.5” or more; upgrading to stainless steel braided lines, especially with the banjo bolt fittings, is recommended. You can find the parts for both front and rear on our “Common Maintenance and Upgrade Part Lookup” page.
4- Spacer lifts, or body lifts, will improve the visual look of your truck but generally decrease the quality of the ride and have zero effect on increased travel or articulation. This applies to adjustable shocks like the Bilstein 5100s; while better than spacer lifts, it increases the preload of the spring which reduces it’s ability to absorb bumps while driving.
The same is true for lifting the rear as well. Doing an Add a Leaf (AAL) is generally preferred to adding blocks in the rear as it prevents axle wrap and increases load capacity and articulation travel.
For specific kits and parts, www.1stgenoffroad.com is the best source of lift components for our trucks bar none.
#3 - Big Battery Upgrade
While our truck’s stock battery size is a Group 24 which is on the smaller size. While it will go past the battery tray, you are able to install larger batteries to increase total Ah capacity and the cold cranking apps to make starting the truck easier. This is especially important if you live in a colder climate, or are running additional accessories like amplifiers or lights.
#4 - Access Cab Rear Window Arms
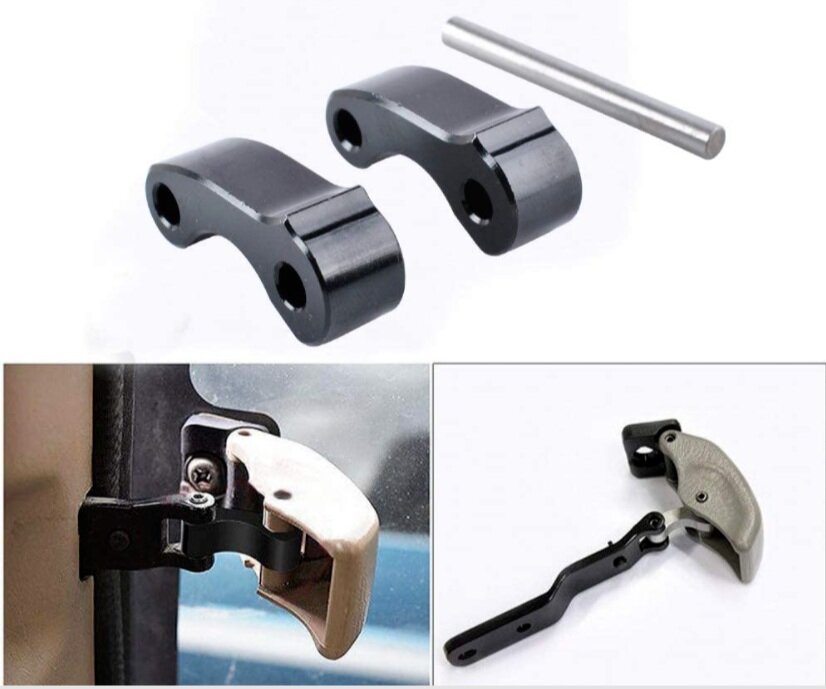
If you have an Access Cab Tundra, one of the most common failures is of the rear window latches breaking. The plastic pivot arm tends to brake, making your rear windows flop around. An easy replacement is swapping in an aluminum pivot arm like this one here.

#5 - Door Hinge Reinforcements
A rather ingenious solution to a failure that is becoming more common as these trucks age, the door stops to prevent them from opening too far is prone to cracking and finally breaking entirely. George Bailey has created bolt on or weld on plates to prevent this from happening. Easy insurance to prevent a potentially very annoying problem. You can contact George from his email, valiantguy.george@gmail.com.
#6 - Stock Air Box Mod
The stock intake on the Toyota Tundra is actually pretty close to a cold air intake, since it takes cooler air from the wheel well instead of inside the engine bay. However, the tube it is pulling air through could be bigger; that’s the stock airbox mod. Limited only by the size of pipe you can find, enlarge the hole and the connecting pipe to allow more air through to your engine.
#7 - Interior LEDs
On earlier models of trucks, 2000-2004, you can swap the LEDs in the instrument panel to different colors or simply brighter lights. You can do the same on 2005-2006 models, but the LEDs are soldered in which is a much more complex job.
On all years, you can swap the interior light bulbs to LEDs to improve the visibility of everything inside. The bulb types and quantities are as follows for a 2004 Tundra:
Dash / Instrument Cluster: (1) T5, (4) T10
Ignition Ring: (1) T5
Driver Foot Light: (1) T5
HVAC: (4) T10, (2) T5
PRND21 Indicator Lights: (7) NEO4
2000-2003
Glove Box Light Bulb Size: 37
Map Light Bulb Size: DE3175
Dome Light Bulb Size: DE3175
Step/Courtesy Light Bulb Size: 194 or 74
Trunk/Cargo Area Light Bulb Size: 921
2004-2006
Glove Box Light Bulb Size: 37
Map Light Bulb Size: 194 or DE3175
Dome Light Bulb Size: DE3175
Step/Courtesy Light Bulb Size: 194 or 74
Trunk/Cargo Area Light Bulb Size: 921
#8 - FJ Windshield Wiper Sprayer
Are you tired of only getting tiny spots of your windshield clean when you turn on the spray nozzle? Would you like a spread out, fan style instead? The FJ Cruiser nozzles plug directly into place and produce an even spray that covers the majority of the windshield. You can find them on Amazon here, or use the part number and find at your local dealer.